
|
The Buxton Technological Course
in Painless Chiropractic
TECHNIQUE OF THE BUXTON TECHNOLOGICAL COURSE
ARRANGING THE ADJUSTING TABLE
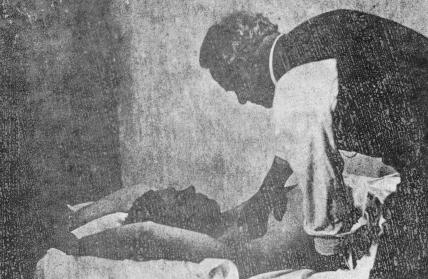
ALMOST any Chiropractic Table can be arranged to give the technique taught in this course. The first thing to do is to have two cushions made containing the best curled hair, with three air holes on each side. The cushions should be fourteen inches square and six inches in width. They can be easily made by any good upholstering establishment at very little expense. The next thing to be done is to lower the extreme ends of the table so as to conform with the natural posture of the body when lying in bed as the body then assumes a slight natural oval posture. More than an oval posture thus described is incorrect to use with the technique herein illustrated. Great care therefore, should be taken in arranging your table as the adjustments taught in The Buxton Technological Course require a table of the configuration mentioned and shown in illustration No. 1.
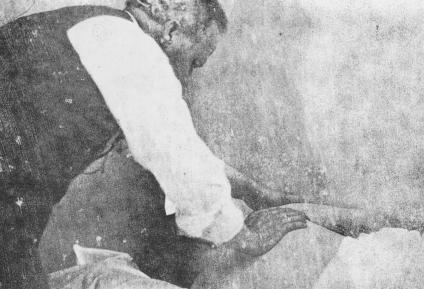
A PAINFUL METHOD OF ADJUSTING ILLUSTRATION No. 2 ILLUSTRATION No. 2 needs very little comment and certainly merits no commendation. A glance at the condition of the spine in such a posture proves the ridiculousness of performing an adjustment upon a patient lying upon an open table. Every segment is meshed an locked one into the other. To give an adjustment in this manner is bound to produce pain and is unscientific and cruel. Is it any wonder there have been malpractice suits, and is not the liability to injury very great? I am glad we are getting away from this inhuman method of adjusting.
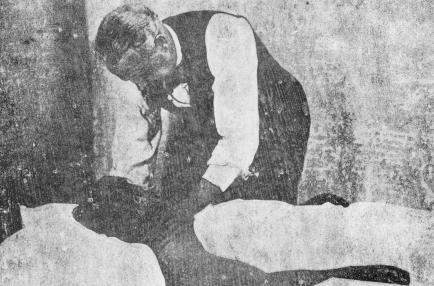
THE OVAL POSTURE METHOD ILLUSTRATION No. 3 AN adjustment given with the spine bent over as shown in illustration No. 3 is not so severe as that in illustration No. 2, but must likewise produce pain. The segmental bodies of the vertebrae are tightly wedged together and inflammation with hyperemia may result. The centrum and processes should be free in posture so as to allow them to move easily upon the facets when an attempt is made to move a vertebra. A popping sound is not to be considered necessary to an accurate adjustment.
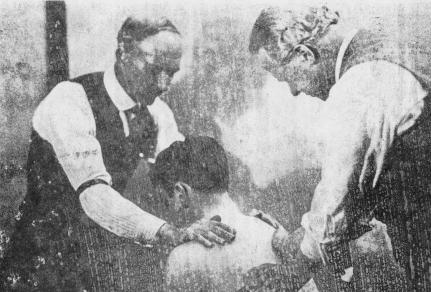
A SCOLIOTIC SPINE ILLUSTRATION No. 4 IT SHOULD be remembered that, in giving adjustments according to The Buxton Technological Course of Instruction, to adjust on the low side of the transverse process always except when a spinous processmove of the first dorsal is necessary, as is shown by illustration No. 12. Read carefully instructions given in Chapter 8. I do not recommend giving a thrust on the high side in any event, but that it be used only in a prying of lifting manner.
SHOWING CONTACT MARKINGS ILLUSTRATION No. 5 Note well the markings to secure a proper contact. No. 1 is used in the dorsal, lumbar and sacroilac regions. No. 2 is used in the dorsal region as both a prying and thrust contact. No. 3 is used when the hands are crossed in giving an adjustment. No. 4 is used in adjusting tiny infants. No. 5 is used to adjust the cervicals. No. 6 is used on the sacrum in making a coccygeal adjustment with contact No. 1; also in the cervical adjustment with contact No. 5.
PREPARING TO GIVE AN ADJUSTMENT ILLUSTRATION No. 6 The student is referred to Chapter VIII, page 35 for explanation of illustration No. 6.
ADJUSTING THE DORSAL VERTBRAE ILLUSTRATION No. 7 The sternum of the adjuster must be directly over the median line of the patients body. The thrust is given downward and slightly toward the superior. Use Contact No. 1 in giving the adjustment.
ADJUSTING THE SACRUM ILLUSTRATION No. 8 The body of the operator must be well forward over
the patient and the thrust given on the low side toward the inferior.
ADUSTING THE ILIUM ILLUSTRATION No. 9 TO ADJUST the ilium place the prying or pressure hand upon the high side of the edge of the sacrum. Bring the thrust hand upon the ilium so as not to interfere with the sacrum and adjust accordingly. In adjusting the ilium orsacrum give the thrust on the low side toward the inferior.
ADJUSTING THE COCCYX ILLUSTRATION No. 10 IN GIVING a coccygeal adjustment stand squarely at the side of the patient placing the pressure hand upon the body of the sacrum and the adjusting, or thrust hand, upon the coccyx, and give the thrust toward the superior. With the one hand placed upon the body of the sacrum, and considerable pressure made therewith, you will observe that the legs of the patient tend to rise upward. Likewise the coccyx in obedience to the pressure or prying motion is lifted up sufficiently to allow the thrust hand a secure contact thereon, and when the adjustment is given toward the superior, the subluxation will be corrected whether it be an anterior, posterior or lateral position. One of the unpleasant and difficult adjustments given by the Chiropractor, heretofore, has been that of adjusting the coccyx, mostly by inserting the index finger within the rectum, or a thrust upon the apex of the sacrum. Both methods have been reasonably successful, the rectal being the prevailing method. Continued practice of the coccygeal adjustment, as shown in illustration No. 10 well soon prove, to the skillful operator, the simple and easier way of obtaining results. Do not become discouraged should the subluxated coccygeal abnormality refuse to respond to the first adjustment, but continue the method as given, and you will find that ere many instances when the first adjustment is given. USE CONTACT No. 6 for the pressure hand, and No. 1 for the thrust hand to adjust the coccyx.
ADJUSTING THE FIRST, SECOND AND THIRD DORSALS ILLUSTRATION No. 11 Showing Contact No. 1 with hands crossed. Adjusting the first, second and third dorsal vertebrae. The thrust is given toward the inferior.
CONTACT NUMBERS 1 AND 6 IN ADJUSTING THE FIRST, SECOND AND THIRD DORSAL VERTEBRAE ILLUSTRATION No. 12 Showing Contacts Nos. 1 and 6 in adjusting the first, second and third dorsal vertebrae on the spinus process. The hands are crossed and the thrust is given toward the inferior.
PREPARING PATIENTS HEAD FOR THE SUPERIOR CERVICAL ADJUSTMENT ILLUSTRATION No. 13 STANDING at the side where the adjustment is to be given, place one hand on the patients head and bring it forward. Then lean forward and place the contact hand around on the patients neck beyond the spinous processes the patients neck directly over the Doctors wrist, but not resting upon it. Now draw the hand lightly toward the patients face until contact No. 5 rests upon the transverse processes, using pressure upon all cervicals with the greater pressure upon the specific subluxation. Then raise your body and at the same time the patients head far enough to lift the vertebrae off the centrums or bodies of the segments, and not too far back to cause the processes to tighten or become locked. You are now ready to give the Superior Cervical Adjustment as explained by illustration No. 16.
THE SUPERIOR CERVICAL ADJUSTMENT ILLUSTRATION No. 14 Preparing to make the Contact No. 5 to give the superior cervical adjustment. Patients body leaning slightly forward, also the adjusters body with relaxation. It is better to have the patient sitting upon a stool. Keep the median line of the patients body straight and use Contact No. 6 to steady the patients head. Hold there until contact No. 5 is secured and then reverse Contact No. 6 to position shown on page 70 in illustration No. 16.
SHOWING CONTACT NO 5 IN THE SUPERIOR CERVICAL MOVE ILLUSTRATION No. 15 Contact No. 5 illustrates giving The Superior Cervical Adjustment, the thumb being placed next to the index finger. Use pressure at Contact No. 5 and never with the finger tips. Contact No. 6, as is shown in illustration No. 16, page 70, is used as the anchor hand. Adjust all the cervicals, putting the greater pressure on the specific subluxated vertebra. Read again page 37, Chapter IX.
THE SUPERIOR CERVICAL ADJUSTMENT SHOWING CONTACT NUMBER 6 ILLUSTRATION No. 16 NOTE the adjuster stands with the front of the body directly on a line with the shoulders of the patient. The position of the adjusters body has a great deal to do in giving an easy and accurate adjustment. Observe closely the operation in illustration No. 15, the slightly leaning posture of the patient, with the body of the adjuster perfectly relaxed. Take up all the slack in the patients neck
by turning the patients head toward you until it can turn no farther.
Then, just as you had put a burr on a bolt and wanted to secure it by a
tightening wrench, likewise in adjusting the cervicals by giving the head
one final quick turn in the direction of the contact hand close to the
index finger. If the thumb is forced to a place in front of the patients
ear, and the operators hand is short, the fingers will slip off the transverse
processes and no adjustment, or an imperfect one, will be made. Hence,
forget the thumb, except as explained above, in giving the Superior Cervical
Adjustment.
ADJUSTING INFANTS IN THE DORSAL REGION ILLUSTRATION No. 17 Showing Contact No. 4. The palms of the adjusters hands should not rest upon the patients body, but drop to the side. Contact No. 4 is used to adjust infants in the dorsal and lumbar region.
ADJUSTING INFANTS IN THE LOWER LUMBAR VERTEBRAE ILLUSTRATION No. 18 Showing Contacts Nos. 2 and 4, with the palms of the adjusters hands free from the patients body. Always have the infant lying upon the mothers knees. Use Contacts Nos. 2 or 4 according to the age and size of the infant. Adjust on the low side as per instructions given in Chapter VIII, page 35. Never adjust on the high side.
THE SUPERIOR CERVICAL MOVE IN ADJUSTING INFANTS ILLUSTRATION No. 19 Showing Contact No. 5 in adjusting the cervicals of a child, with Contact No. 6 as shown in illustration No. 16, page 700 Remember to put the pressure at No. 5 and never at the finger tips. Use as many fingers as you can conveniently get about the infants neck. Follow instructions given on page 71 for the Superior Cervical Adjustment.
ADJUSTING BEDRIDDEN PATIENTS ILLUSTRATION No. 20 WHERE the patient is confined to the bed and cannot get out upon the table to receive an adjustment, the Chiropractor will find instructions given in illustrations Nos. 20, 21 and 22 to be of great and valuable service. Use contact No. 1 for the adjusting hand and contact No. 6 for the anchor or securing hand. For the cervical adjustment use contact Nos. 5 and 6 the same as in the sitting up position.
ADJUSTING BEDRIDDEN PATIENTS UPPER DORSAL REGION ILLUSTRATION No. 21 Showing Contacts Nos. 1 and 6. Adjusting the upper dorsal vertebrae of bedridden patients. See instructions on page 79 and Chapter VII, page 33.
ADJUSTING LOWER LUMBARS OF BEDRIDDEN PATIENT ILLUSTRATION No. 22 Showing contacts Nos. 1 and 6. Adjusting the lower dorsals and lumbar vertebrae. The case is that of a patient confined to the bed. See Chapter VII, page 33, and instructions on page 79.
ADJUSTING BEDRIDDEN PATIENT WITH THE SUPERIOR CERVICAL MOVE ILLUSTRATION No. 23 Showing contact No. 5 as in illustration No. 15 on page 68. It matters not if the patient is sitting up or lying down, the same contacts are taken in giving The Superior Cervical Adjustment. Observe instructions given on page 71.
THE SITTING POSITION ADJUSTING THE DORSALS ILLUSTRATION No. 24 Showing Contact No. 1 with patient in sitting position. Adjusting the upper dorsal vertebrae. Always give the adjustment on the low side of the transverse processes. See Chapter VIII, page 35.
ADJUSTING THE DORSAL REGION WITH THE WALL POSITION ILLUSTRATION No. 25 Showing patient leaning against the wall while the upper dorsal vertebrae are being adjusted. Contact Nos. 1 and 3 are used, with hands crossed, in giving the adjustment. Use a soft pillow or cushion.
THE WALL POSITION IN ADJUSTING THE LUMBARS ILLUSTRATION NO. 26 Showing use of Contact No. 1 in adjusting the lumbar vertebrae with patient leaning against the wall. Use a pillow or soft cushion as shown in illustration. It is presumed, in this case, that the patient cannot lie down upon an adjusting table.
THE STANDING POSITION IN ADJUSTING UPPER DORSALS ILLUSTRATION No. 27 Showing the patient standing up to receive an adjustment of the upper dorsal vertebrae. Use Contacts Nos. 2 and 6 with the body of the patient bent slightly forward. Adjust on the low side always.
THE STANDING POSITION WITH HANDS REVERSED ADJUSTING THE DORSALS ILLUSTRATION No. 28 Note, Contact No. 6 is reversed to the left shoulder of the patient, as the anchor or hand and Contact No. 2 is reversed to the right side transverse processes. Adjusting the upper dorsal vertebrae. |